Login to your Google account and head over to your Google Console. You'll need to create a new project if you do not have one. A new project can be created here.
From the developers console, click on Credentials on the sidebar to access the credentials for your project. Alternatively, you may access this link directly.
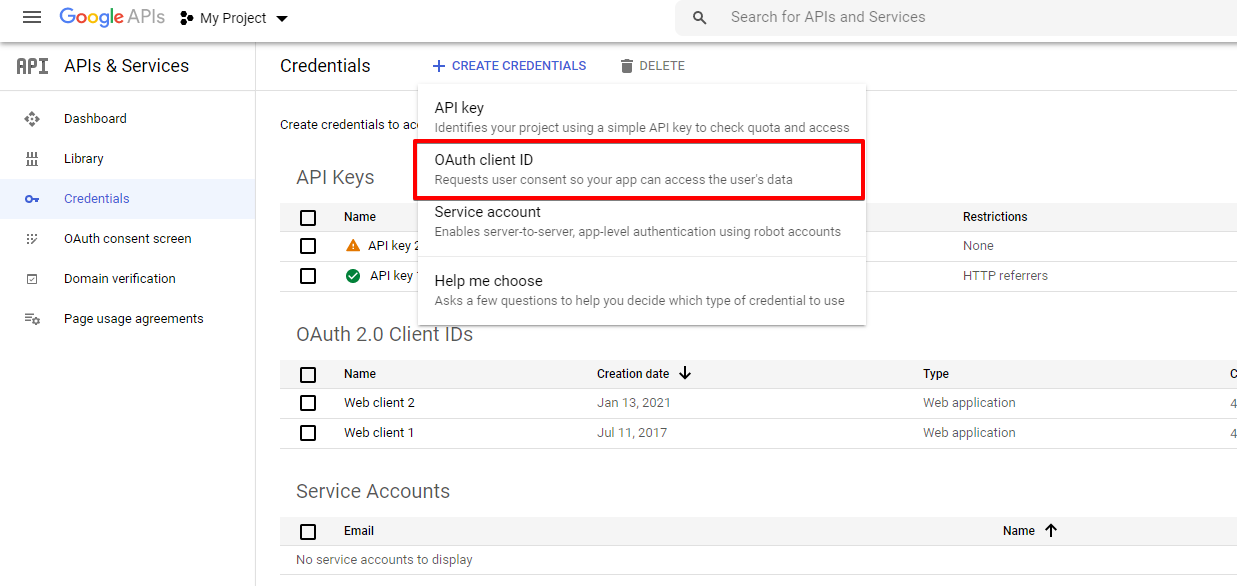
Click on the Create Credentials button at the top and select OAuth client ID.
Select Web application for the Application type.
Enter the following urls for Authorized JavaScript origins
https://yoursite.com
Enter the following urls for Authorized redirect URIs
https://yoursite.com
https://yoursite.com/index.php?option=com_easysocial&view=registration&layout=oauthDialog&client=google
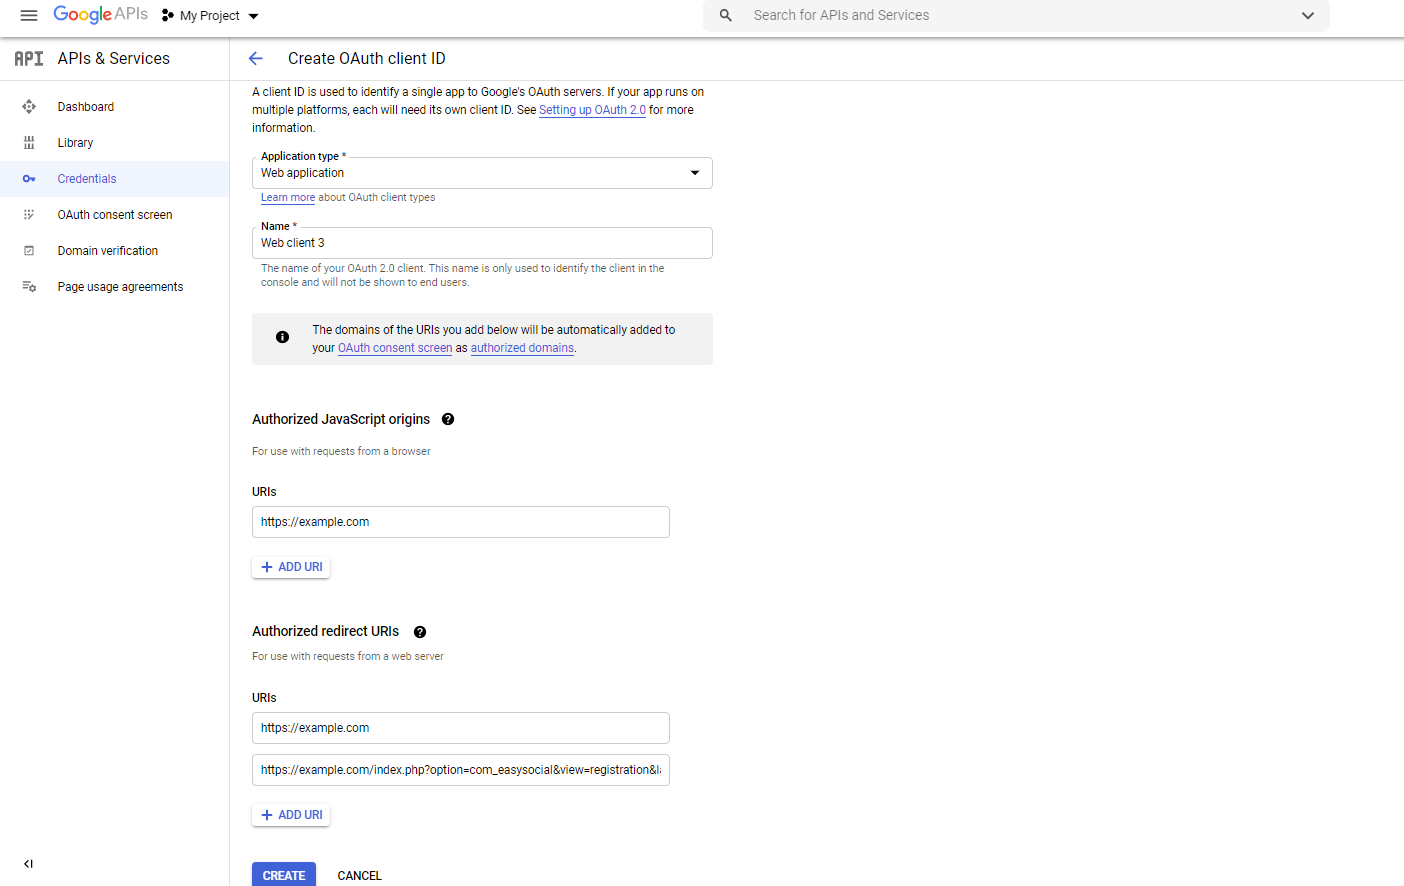
If your site is also accessible with www(eg. https://www.yoursite.com), you have to add the url to the list of urls in the credentials area.
Once the relevant details are filled, click create.
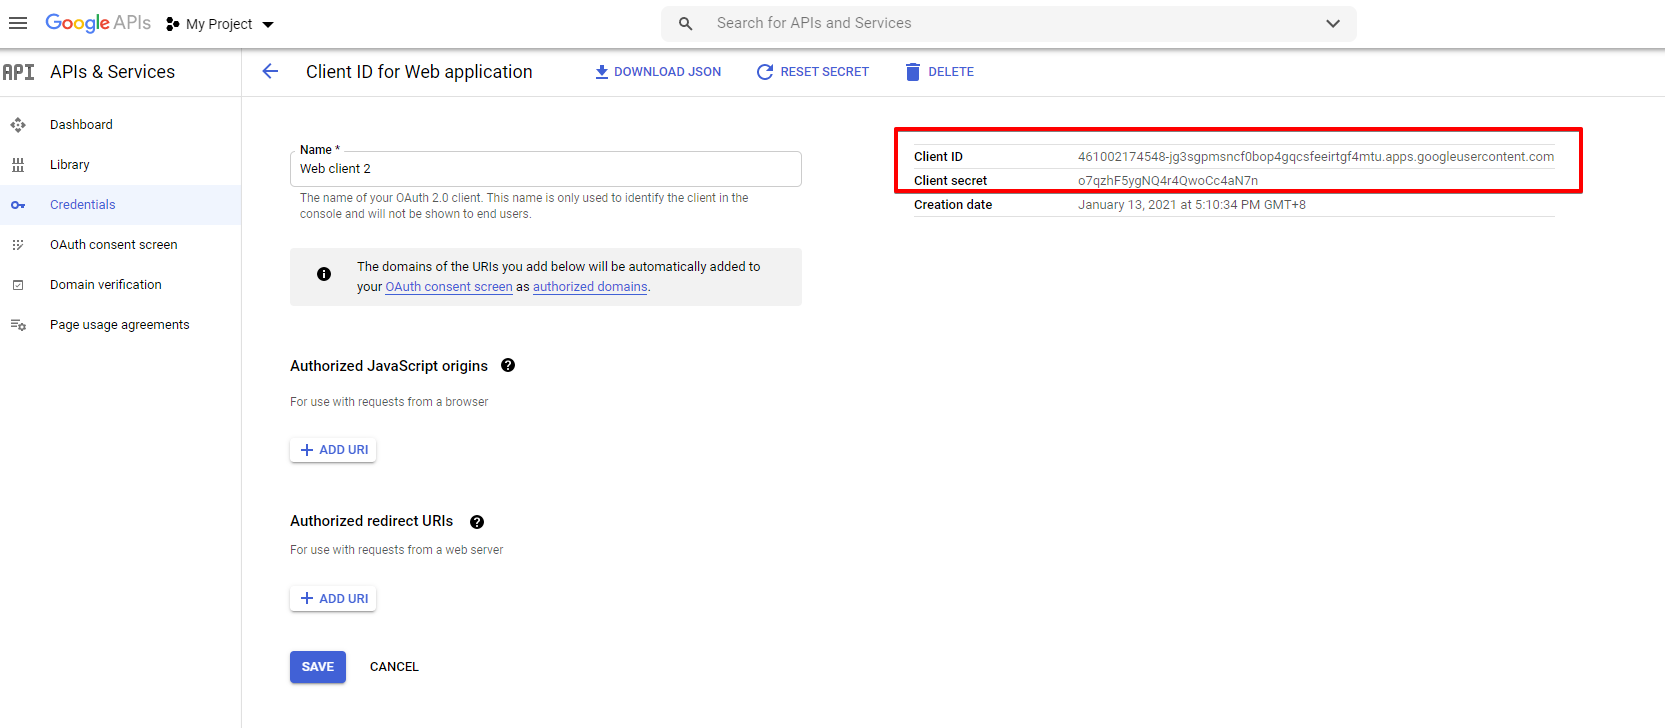
Copy the Client ID and Client secret and paste in their respective settings at EasySocial > Settings > Social > Google.
Documentation
- Easyarticles
- Easyblog
- Welcome
- Setup
- Upgrades
- Configuration
- Amp Configuration
- Amp Specification
- Changing The Default Editor
- Feeds Importer
- Gdpr Configuration
- General Data Protection Regulation
- How To Configure Medias
- Instant Article Configuration
- Location Services Settings
- Onesignal Push Notification
- Password Protection
- Post Cover
- Post Option Precedence
- Preventing Accidental Publishing
- Quick Postings
- Reactions
- Setting Up Google Analytics
- Setting Up Image Optimization
- Support Webp Images
- System Configuration
- Truncation Settings
- User Actions Log
- Yourls
- Autoposting
- Cronjobs
- Composing
- Composing Methods
- Composer Blocks
- Changing Default Editor
- Audio Block
- Behance Block
- Button Block
- Code Block
- Codepen Block
- Columns Block
- Dailymotion Block
- File Block
- Gallery Block
- Gist Block
- Heading Block
- Html Block
- Image Block
- Image Comparison Block
- Instagram Block
- Link Block
- Metacafe Block
- Alerts Block
- Page Break Block
- Pinterest Block
- Quotes Block
- Readmore Block
- Rule Block
- Slideshare Block
- Soundcloud Block
- Spotify Block
- TED Block
- Tab Block
- Table Block
- Text Block
- Thumbnails Block
- Tweet Block
- Video Block
- Vimeo Block
- Youtube Block
- GIPHY Block
- How To Add Post Cover
- How To Add Readmore Block In Composer
- Plugins
- Layouts
- Menu Item
- All Authors
- Single Author
- All Categories
- Single Category
- Dashboard Categories
- Dashboard Comments
- Dashboard Compose Layout
- Dashboard Edit Profile
- Dashboard Overview
- Dashboard Posts
- Dashboard Quickpost
- Dashboard Subscriptions
- Dashboard Revision Layout
- Dashboard Tags
- Archived Posts
- Calendar
- Featured Posts
- Frontpage
- My Blog
- Single Latest Post
- Single Post
- Login
- All Tags
- Single Tag
- All Teams
- Single Team
- Grid
- Magazine
- Module Positions
- Modules
- Enabling Modules
- Showcase Module
- Latest Comments Module
- Most Commented Post Module
- Most Popular Post Module
- Archive Module
- Biography Module
- Calendar Module
- Image Wall Module
- Latest Blogger Module
- Post List Module
- Post Map Module
- Post Meta Module
- Quick Post Module
- Random Post Module
- Related Post Module
- Search Blog Module
- Subscribe Module
- Subscribers Listing Module
- Tags Cloud Module
- Team Blog Module
- Ticker Module
- Top Blogs Module
- Welcome Module
- Troubleshooting
- Customizations
- Migrations
- How Tos
- How To Add Members To Team Blog
- How To Configure Frontpage Posting
- How To Create Category As Page Content Separated From EasyBlog
- How To Create Post Templates
- How To Export And Import Post Templates
- How To Mass Assign Subscribers
- How To Override Date Format
- How To Post Blog Into Team Blog
- How To Subscribe A Blog
- Optimizing Assets On Joomla
- Prevent Spammers
- Set Up Helix Theme
- Set Up Uikit Theme
- Setting Up Teamblogs
- Uninstall Easyblog
- Upload Category Avatars
- Access Control
- Translations
- Remote Publishing
- Integrations
- Integrating With Flickr
- Integrating With Mailchimp
- Integrating With EasySocial
- Integrating With Easydiscuss
- Integration With Phoca PDF
- Integrating With Pingomatic
- Integrating With Sendy
- Integrating With Alpha User Points
- Integrating With JFBconnect
- Integrating With JomSocial
- Unsplash Integration
- Integrating With Google Docs
- How To Enable Addthis
- How To Enable Sharethis
- How To Integrate Vkontakte
- How To Set Up Easyblog Event Blogging With JomSocial
- How To Set Up Easyblog Group Blogging With JomSocial
- How To Submit Blog To Easysocial Group And Event
- Integrating With Amazon S3
- Social Integrations
- Comments
- Integrating With Compojoom Comments
- Integrating With Disqus
- Integrating With Easydiscuss Comments
- Integrating With Hypercomments
- Integrating With EasySocial Comments
- Integrating With Facebook Comments
- Integrating With Jcomments
- Integrating With Intense Debate
- Integrating With Komento
- Using Multiple Comment Systems
- How To Disable Comment On Specific Post
- How To Enable Comment Form On Particular Post
- Easyblog 3
- Easydiscuss
- Welcome
- Configuration
- Acl
- Adding New User Roles
- Akismet Anti Spam
- Cleantalk Anti Spam
- Creating Language String Override
- Enabling Subscriptions
- General Data Protection Regulation
- Mass Assign Badges
- Moderation In Easydiscuss
- Modules Plugins
- Obtaining Facebook App Id
- Obtaining Facebook Id
- Recaptcha Anti Spam
- Setting Up Anonymous Post
- Setting Up Email Digest
- Setting Up Email Parser
- Setting Up Moderators
- Setting Up Private Discussion
- Setting Up Reply Break Email Parser
- Setting Up Work Schedule And Holiday
- User Actions Log
- Upgrades
- Cronjobs
- Remote Storage
- Menu Layouts
- Menu Layouts
- Archives Layout
- Ask A Question Layout
- Badges Layout
- Categories Layout
- Dashboard Layout
- Edit Profile
- Forums Layout
- Frontpage Layout
- Inbox Layout
- Multi Tags Combination Layout
- My Assigned Post Layout
- My Favourites Layout
- My Post Layout
- My Subscription Layout
- Notification Layout
- Post Layout
- Single Category Layout
- Tag Layout
- Tags Listing Layout
- User Profile Layout
- Users Layout
- Module Position
- Autoposting
- Integrations
- Templating
- How Tos
- Crash Course Video
- Date Format
- Google Map Api Restrictions
- How To Assign Moderators In Easydiscuss
- How To Change Editor
- How To Change Owner Of Orphaned Post
- How To Delete An User From Easydiscuss
- How To Download Easydiscuss Modules
- How To Enable Easydiscuss User Plugin
- How To Install Language
- How To Integrate Avatar With Other Component
- Location Services
- Migrator
- Rest Api
- Translations
- Modules
- Module Package Manager
- Ask Module
- Board Statistic Module
- Categories Module
- Latest Replies Module
- Leaderboard Module
- Most Hit Discussion Module
- Most Likes Discussion Module
- Most Replies Discussion Module
- Most Voted Discussion Module
- Navigation Module
- Notification Module
- Post Info Module
- Quick Question Module
- Recent Discussion Module
- Recent Replies Module
- Search Discussion Module
- Similar Discussion Module
- Tag Cloud Module
- Top Members Module
- Welcome Module
- Who Is Online Module
- Who Is Viewing Module
- Your Discussion Module
- Plugins
- Easysocial
- Welcome
- Setup
- Updates
- Configuration
- Administrator Broadcasting
- Advanced Search Sorting
- Advertisements
- Animated Gif Processing
- Clusters Duplicate Title
- Comments Settings
- Conditional Fields
- Content Delivery Network(CDN)
- Conversations Settings
- Dashboard Layout Settings
- Facebook Autoposting
- Facebook Configuration
- Gdpr Acl Configuration
- Gdpr Joint Download
- General Data Protection Regulation
- Global Events Settings
- Global Groups Settings
- Global Pages Settings
- Google Map Api Restriction
- Honeypot Antispam
- Import Photo Exif Data
- Jfbconnect Integration
- Location Services Settings
- Lock Down Mode
- Login Layout Settings
- Notification Automated Cleanup
- Notification Settings
- Onesignal Integration
- Photo Layout Settings
- Photo Uploader Settings
- Profile Competion Settings
- Profile Layout Settings
- Remote Storages Settings
- Reporting Settings
- Search Indexing
- Setting Up Image Optimization
- Site Administrator Exclusion
- Social Bookmarking
- Storage Paths Settings
- Story Form Settings
- Story Links Parsing Behavior
- Stream Pagination
- Stream Settings
- Stream Translation
- Stream Truncation
- Tag Non Friends In Cluster
- Twitch Tv
- Twitter Autoposting
- Twitter Configuration
- Users Authentication
- Users Name Format
- Users Registration Settings
- Users Settings
- Videos Encoding
- Videos Layout Settings
- Videos Settings
- Workflows
- Social Integrations
- Cronjobs
- Profile Types
- Applications
- Applications
- Custom Fields
- Articles Plugins
- Discuss Apps
- Docker Plugin
- Google Adsense Apps
- Google Recaptcha Plugin
- Group Reviews Apps
- K2 Article Apps
- K2 Article Plugins
- Kunena Field
- Kunena Plugins
- Linkedin Apps
- Onesignal Push App
- Operation Hours Field
- Page Reviews Apps
- Polls App
- Registration Requester Plugin
- Steps
- Twitter Apps
- Url Shortener Plugin
- Modules
- Introduction About Modules
- Albums Module
- Calendar Module
- Dating Search Module
- Dropdown Menu Module
- Event Categories Module
- Event Menu Module
- Event Module
- Followers Module
- Friends Module
- Group Categories Module
- Group Menu Module
- Group Module
- Leader Board Module
- Log Box Module
- Login Module
- Menu Module
- Notifications Module
- Oauth Login Module
- Page Categories Module
- Page Menu Module
- Page Module
- Photo Module
- Profile Completeness Module
- Profile Statistics Module
- Quick Post Module
- Quick Registration Module
- Recent Polls Module
- Search Module
- Social Goal Module
- Stream Module
- Users Module
- Videos Module
- Templating
- Introduction
- Installing New Themes
- Adding Custom Css Codes
- Template Overrides
- Global Template Overrides
- Overriding App Icons
- Overriding App Theme
- Overriding Plugin Theme
- Overriding Badges
- Overriding Default Avatar
- Overriding Default Cover
- Customizing Email Logo
- Customizing Email Template
- Overriding Smileys Emoticons
- Customizing Quick Registration Fields
- Customizing Frosty Toolbar
- Overriding Custom Fields
- Events
- Groups
- Marketplaces
- Pages
- Reporting
- Email Activities
- Users
- Introduction
- Pending Users
- Creating New User
- Creating Global Filters
- User Privacy
- How Do I Restrict Search By Username
- How Do I Allow Users To Change Username
- How Do I Export Users In Easysocial
- Switching Profile For Users
- How Do I Display Easysocial Related Information On Joomla Articles
- Allowing Users To Use Email To Login
- Creating Short Urls For Users
- Importing Users With Csv
- Enable 2 Factor Authentication
- Updating Default Cover
- Users Verification
- Achievements
- Migrators
- Activity Stream
- Points
- Menu Views
- Menu Views
- Activity Logs
- Advanced Search
- All Albums
- Applications
- Badges
- Conversation Archives
- Conversation Composer
- Conversation Inbox
- Create Album
- Create Event
- Create Group
- Create Video
- Dashboard
- Edit Notifications
- Edit Privacy
- Edit Profile
- Event Category Layout
- Events
- Followers
- Forgot Password
- Forgot Username
- Friends
- Groups
- Groups Category Layout
- Leader Board
- Login Layout
- Logout Action
- My Albums
- Notifications
- Points History
- Points Listings
- Profile
- Profile About
- Profiles Layout
- Registration
- Search
- Single Album Item
- Single Badge Item
- Single Event Item
- Single Group Item
- Single Points Rule
- Single Video Item
- User Achievements
- Users
- Videos
- Videos Category Layout
- Module Positions
- Module Position
- Achievements Position
- Activities Position
- Albums Position
- Apps Position
- Audios Position
- Coversations Position
- Dashboard Position
- Edit Notifications Position
- Edit Privacy Position
- Edit Profile Position
- Event Page Position
- Followers Position
- Friends Position
- General Position
- Group Page Position
- Leaderboard Position
- Page Position
- Photos Position
- Polls Page Position
- Profile Position
- User Position
- Video Page Position
- Remote Storage
- Languages
- Mobile Apps
- Good To Know
- Hows To
- How To Add Profile Type As Criteria In Advanced Search
- How To Add RSS Feeds In Group
- How To Add Story Filter
- How To Assign Custom Fields Into Mini Registration
- How To Enable Plugins Captcha Recaptcha
- How To Integrate GIPHY With Easysocial
- How To Integrate Kunena With Easysocial
- How To Integrate Mailchimps
- How To Order Widgets
- How To Remove Checkboxes On Advanced Search
- How To Set Notification Marked As Read
- How To Set Up Ffmpeg With Runcloud
- How To Set Up Recaptcha On Easysocial 3.x
- How To Setup Profile Completion
- How To Share Joomla Articles To Easysocial
- How To Show Fields In Quick Registration Module
- How To Switch Event Category
- How To Switch Group Category
- How To Turn Off User Inactive Reminder
- EasySocial Error Messages
- Application Not Found
- Invalid Application Id Provided
- Invalid Badge Id Provided
- Invalid Event Category Id
- Invalid Identifier Provided In The Request. Report To The Site Administrator
- No Valid Registration Page Found For This Profile.
- Sorry But Photos Has Been Disabled On The Site
- Sorry But Registrations Has Been Disabled
- Sorry But The Content Is Currently Not Available
- Sorry But The Events Feature Has Been Disabled
- Sorry But This Page Isnt Available
- Sorry But You Are Not Allowed To Read This Conversation
- Sorry But You Cannot Access This Page Because Admin Had Disabled The Application Browser
- Sorry But You Cannot Access This Page Because The User Did Not Install The Application
- Sorry Conversations Is Not Enabled On The Site
- Sorry Please Complete Your Step First Before Proceeding To The Other Steps
- Sorry We Are Unable To Locate Your Active Registration Session. Please Try Again
- Sorry You Are Not Allowed To Create New Conversations
- The Provided Top Level Domain Is Not Supported In This Site
- Unable To Perform This Action Please Try Again Later
- You Are Currently Running On Development Environment
- You Are Trying To Access A Restricted Content.
- You Are Trying To View An Invalid Album.
- You Will Need To Install The App First In Order For You To Be Able To Access The App
- Your Domain Is Not Licensed To Utilize Our Installer Api
- Known Issues
- Komento
- Welcome
- Setup
- Update
- Cronjobs
- Configuration
- Antispam
- Integrations
- Customization
- How Tos
- Enable Comments For Selected Articles
- How To Change Datetime Format
- How To Create Language String Override
- How To Enable Replies
- How To Hide Login Form
- How To Hide Permalink On Comment Item
- How To Integrate Alpha User Point
- How To Integrate Other Component Avatar
- How To Setting Up Recaptcha
- How To Show Conversation Bar
- How To Show Read More Link
- How To Sort Comments
- Onesignal Push Notification Configuration
- Advance
- Metaman
- Payplans
- Welcome
- Settings
- Upgrading
- Orders
- Registration
- Statistics
- Plans
- Discounts And Referrals
- Payment Methods
- Payment Methods
- 2checkout
- Alipay
- Authorize Cim
- Authorize Net
- Authorize Net Vs Authorize Cim
- Bitpay
- Braintree
- Ccavenue
- Compay
- Ebanx
- Epay
- Eway
- Fastspring
- Ingenico Payment Services
- Mercury Processing Services
- Nets
- Offline Payment
- Paddle
- Pagseguro
- Pay With Points
- Payfast
- Payflow
- Paygate
- Paypal
- Paypal Advanced
- Paypal Pro
- Paysite Cash
- Payu Poland
- Payu Turkey Payment Gateway
- Payumoney Payment Gateway
- Payunity
- Payzen
- Pin Payment
- Quickpay
- Remita
- Robokassa
- Saferpay
- Skrill
- Smoovpay Payment Gateway
- Stripe
- Stripe Alipay
- Stripe Checkout
- Apps
- Acymailing
- Altauserpoint
- Altauserpoint (AUP) Discount
- Basic Tax
- Content Acl
- Content Hider
- Dj Classifieds
- Easyblog Category Access Restriction
- Easyblog Post Submission Restriction
- Easydiscuss Badges
- Easydiscuss Ticket Submission Restriction
- Easysocial Advertisement Submission Restriction
- Easysocial Badges
- Easysocial Event Submission Restriction
- Easysocial File Storage Limit
- Easysocial File Upload Limit
- Easysocial Group Admin Assignment
- Easysocial Group Submission
- Easysocial Groups
- Easysocial Marketplace Submission Restriction
- Easysocial Page Admin Assignment
- Easysocial Page Submission Restriction
- Easysocial Points
- Easysocial Profile Types
- Easysocial User Points Modifier
- European Union Value Added Tax (EUVAT)
- Friend Subscription
- Google Analytics
- Jevents
- Jomsocial Multiprofile Types
- Joomla Article Submission Restriction
- Joomla Article Restrict
- Joomla User Type
- Jreview
- K2 Category Access Control
- K2 Item Access Control
- K2 Usergroup Access Control
- Kunena
- Mailchimp
- Mailster
- Menu Access
- Module Access
- Mosets Tree
- Phoca Download
- Post Affiliate Pro
- Sobi Pro
- Terms And Conditions
- Virtuemart
- Zoo
- Modules
- Users
- Notifications
- Emails
- Automation
- Logs And Reports
- How Tos
- Essential Settings In Payplan Admin Should Know
- How To Cancel Recurring Subscription
- How To Earn More By Access Controlling In Payplans
- How To Enable Sales Popup
- How To Setup Directory Listing In Payplans
- How To Setup Easyblog With Payplans
- How To Setup Easysocial With Payplans
- How To Setup Notification Emails In Payplans
- How To Setup Plan Title And Description To Support Multilanguage
- How To Use Access Control In Payplans
- How To Use Micro Subscription In Payplans
- How To Use Plan Relationship Feature
- How To Use Yootheme Dynamic Content And Access Rules In Payplans
- Must Have Apps In Payplans
- Cronjobs
- Customization
- Templates
- Welcome
- Agency
- Archi
- Berlin
- Boston
- Cafe
- Carrie
- Charm
- Cleanx
- Coax
- Cretiv
- Dental
- Desire
- Echo
- Elegant
- Event
- Finance
- Fitness
- Fluent
- Gurukul
- Haulage
- Infinity
- Kidzone
- Medicx
- Movers
- Newyork
- Office
- Paris
- Pixel
- Recruiter
- Salon
- Seattle
- Servx
- Stylo
- Vanilla
- Voyager
- Wanderers
- Workout
- Yogahut
- Modules
- Gallery Module
- Jd Accordion Module
- Jd Before After Module
- Jd Countdown
- Jd News Ticker
- Jd Price List Module
- Jd Pricing Tables Module
- Jd Process Module
- Jd Progress Bar Module
- Jd Services Showcase Module
- Jd Simple Contact Form Module
- Jd Skillset Module
- Jd Tabs Module
- Jd Testimonials Module
- Jd Timeline Module
- Jd Tweet Module
- Register Login Module
IMPORTANT
This is the outdated SI-documentation which will be adapted soon. A huge part may be obsolete!


